Showing posts with label snack. Show all posts

Monday, March 3, 2014

Better Butters

Isn't it great when you re-discover something you already have and fall in love all over again?  Well, that has happened to me recently...  with my food processor.  It had taken a bit of a backseat to the Vitamix, but lately has been churning out delicious goodies at least once a week!

nuts and seeds

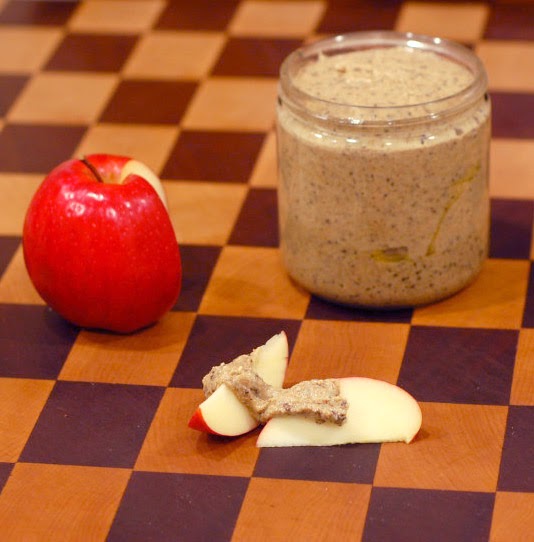
It all started when I finally broke down and tried Nutzo.  As delicious as it might be, I needed to come up with my own nut and seed butter that I could afford.  You could certainly play around even more with the combinations of nuts and seeds, but you'll find my go-to recipe below.


The next treat I discovered was coconut butter.  Coconut, toasted until a nice golden brown, then whirred in your food processor until creamy.  I usually add a pinch of salt, and would say that you should, too!  One batch also got some dark chocolate tossed in...  oh my.  This could take the place of dessert for me any day of the week.  You can find step-by-step pictures here.


Roasted Nut & Seed Butter
Yield ~2c

1c almonds
1/2c cashews
1/2c brazil nuts
1/4c pumpkin seeds
2T hazelnuts
2T ground flax seeds
2T chia seeds
1/2t fine sea salt

Preheat oven to 170deg.

Place almonds, cashews, brazil nuts, pumpkin seeds and hazelnuts on a cookie sheet and roast for ~5hrs.  If you want to remove hazelnut skins, you can do so easily after roasting, they slip right out.

While still warm, transfer nuts/seeds to the large bowl of a food processor.  Add remaining ingredients and blend until smooth, scraping down the sides of the bowl a few times.


If you're fortunate enough to have a food processor, what have you made in it lately??

Thursday, February 14, 2013

Tamari Almonds

Happy Thursday!


A little nod to Valentine's day, I just had to share this heart-shaped pomegranate seed I found :)  And now back to today's snack...

Have you ever tried tamari almonds?  Hopefully I'm not the only one who got hooked on them after one handful?  They're awfully easy to eat, but not easy on the wallet.  I finally got around to making them at home and whaddya know, they're even better!  (I know, I should not be surprised)


When researching some recipes, I came across a few that used a low and slow method for roasting nuts.  A little research brought me to this page and learned that roasting nuts at high temperatures can cause the breakdown of fats found in nuts.  I loved the way these came out so much that I haven't tried to roast at a higher temperature, but if you don't want the oven all day (or night), feel free to roast at 350deg.


Tamari Almonds
adapted slightly from Gluten Free Mommy

1lb almonds
1/2c + 2T tamari

Combine almonds and tamari in a bowl and stir to combine.  Let almonds marinate for 30min, stirring occasionally.

Strain almonds (I reserve the tamari for another batch of almonds) and spread into a single layer on a baking sheet.  You can use a Silpat if you like, but I've done it without as well.  Place baking sheet in the oven and turn oven on to 170deg.  Slow roast almonds for 5-7hours (or overnight if you like).  Let cool, then store in a tightly sealed container.


Have you ever tried tamari almonds before??

Thursday, December 6, 2012

Banana Oatmeal Cookies

You may have noticed that my posting schedule has become less frequent of late.  Indeed, there has been a lot going on this past year behind the scenes.  Not the least of which includes my involvement with Boston's chapter of Girls on the Run.  Girls on the Run is an amazing non-profit organization whose mission is to help young girls develop healthy habits and self-esteem, all the while training for a 5k.

image source

I'm sure you can imagine that working with 20 girls this season has been extremely rewarding, if not slightly challenging at times ;)  They cease to amaze me with their insights on difficult topics and boundless energy.  Many girls are surprised by what they can do with a little encouragement (or a lot!), and I know there will be some very proud coaches and families at the finish line of the run.

wordle from a lesson earlier this season

As the girls are wrapping up their season this Sunday at Walter's Run, I wanted to bake up a quick treat for their last practice.  I'm guessing none of the girls suspected they were healthy, and the requests for seconds makes me think they were quite a hit!


Banana Oatmeal Cookies
adapted from Live Well 360 (which may not exist anymore)
yield:  2 1/2 dozen

For a nut-free version, I bet oat flour (oats ground in a food processor) would work in place of the almond meal.

3 large bananas
2t vanilla extract
1/4c melted coconut oil
2c rolled oats (I used Extra Thick, use GF if desired)
2/3c almond meal
1/2t cinnamon
1/2t sea salt
1c mini cinnamon chips

Preheat the oven to 350deg.

In a large bowl, mash the bananas.  Add in vanilla and coconut oil and whisk well to combine.  In another bowl, mix together oats, almond meal, cinnamon sea salt and cinnamon chips.  Add to the banana mixture and stir until combined.  Using a small cookie scoop (or a 1T measure), drop cookies onto a parchment-lined baking sheet ~1" apart.  Press down gently with your fingers to get a flatter cookie (they won't spread while baking).  Bake for 12-15min, until they're not too soft to the touch and the cookies don't look wet anymore.  Let cookies cool completely on the baking sheet and then store in an airtight container.


Sound like a cause you'd like to help out?  There are many ways to get involved!!

Wednesday, October 24, 2012

Spaghetti Squash Pie

I'm no stranger to squash, and often find myself roasting one (or two!) a week all throughout the winter.  For this month's challenge, though, I wanted to break from my routine and come up with something a little more non-traditional.  Are you ready for it?


Yup, I put spaghetti squash in a dessert!  It's definitely not the first squash you'd pick to go over to the sweet side, but I remembered seeing one on the Today Show last two years ago so I knew it could be done.


I'd say this is like a custard pie, with the spaghetti squash providing just a little bit of texture (I might even try added 3c next time!).  I ran with the coconut theme, making it dairy-free and even more delicious.  An unusual but tasty treat ;)


Spaghetti Squash Pie
adapted from food for a hungry soul

I used coconut sugar here, which is more subtle on the sweetness scale than regular sugar.  This makes it perfect for a snack or dessert.  If you prefer your dessert a little sweeter, I'd suggest using 3/4c evaporated cane juice (or granulated sugar).

1 can light coconut milk
6T white whole wheat flour  (oat flour would work well here to keep it grain-free)
1/2c coconut sugar *see head note
2t baking powder
1/4t salt
4 eggs
1t vanilla extract
1/2t coconut extract (optional)
2c cooked spaghetti squash
roasted coconut, for garnish (optional)

Preheat oven to 350deg.

Add all ingredients except for squash and roasted coconut to a blender and blend until well combined and smooth, 1-3min.  Pour into a bowl and stir in squash, making sure that it's evenly distributed.  Pour into a 9 or 10" pie plate.  Bake for 50-60min, or until the top is browned and a knife comes out clean (insert it in the middle of the pie).  It may still be jiggly in the middle (my usual test), and that's ok.  Cool on a wire rack.

Garnish with roasted coconut if desired, or serve with whipped coconut cream.


Thanks again to Natasha & Laz for hosting!  How do you like your spaghetti squash??

Wednesday, August 29, 2012

Strawberry Basil Scones

It's tea time for this month's 5 Star Foodie Makeover!


When I heard plans for our virtual British afternoon tea, I immediately thought of strawberries and cream.  I know, I know, more Wimbledon than tea party, but I couldn't shake the idea and decided to morph it into something you would normally see at a tea party...  scones!


My incarnation of strawberries and cream turned into a strawberry basil scone served with coconut cream.  Dehydrating the berries a bit helped prevent adding alot of extra moisture to the scones.  They were quite delicious, especially served alongside some tea, however I realized that I don't have any "proper" tea cups!  Please excuse the oversize mugs that I'm partial to :)


Strawberry Basil Scones w/Coconut Cream
scones adapted from A Cozy Kitchen, coconut cream from Cook's Illustrated (found here)
yield:  6 scones

If you have a chance, put your coconut milk in the fridge the day or two before you're planning on making the scones, it will help solidify the cream of coconut!

For the scones:
8 medium strawberries, quartered
1c flour (I used a mix of white whole wheat, oat and cake flour*)
1 1/2t baking powder
1 1/2T evaporated cane juice (or granulated sugar)
1/4t fine sea salt
2 1/2T unsalted butter, cold  (could use Earth Balance to make these completely dairy-free)
6 medium basil leaves
1/2c coconut milk (full fat, or heavy cream), plus a little extra

For the coconut cream:
1 can full fat coconut milk
1 1/2t evaporated cane juice (or granulated sugar)
1/2t vanilla extract
pinch salt

Preheat the oven to 200deg.

Place strawberries on a parchment paper-lined baking sheet.  Bake the strawberries for 45min-1hr, until they are slightly dehydrated.  Set aside to cool.

Turn the oven to 425deg.  Place a mixing bowl and beaters into the freezer.

In a medium bowl, add flour, baking powder, sugar and salt.  Whisk together.  Grate in butter and using your hands, quickly work the butter into the flour until it resembles a coarse meal.  Chiffonade basil leaves (roll into a cigar and slice, creating ribbons) and add them to the flour/butter mixture along with the strawberries.  Gently combine and then pour in coconut milk and mix until the dough begins to form, ~30sec.

Transfer dough to a lightly floured surface and knead by hand just until it comes together into a rough, slightly sticky ball, 5-10sec.  Pat dough into a 1" thick circle and cut into 6 wedges  (or 4 or 8, if you prefer).  Put scones on a baking sheet lined with parchment paper.  Brush with coconut milk and then bake 12-15min, until scones are light brown.

While the scones are baking, remove the can of coconut milk from the fridge and the bowl/beaters from the freezer.  Using a spoon, take off the top layer of cream that should have formed (reminded me of shortening) and add it to the bowl.  Add in the sugar, vanilla and pinch of salt.  Beat on low speed until small bubbles form, ~30sec.  Increase the speed to high and beat until the cream thickens and light peaks form, ~2min. Refrigerate until your scones are done cooling.

Once the scones are done, transfer them to a wire rack for at least 10min to cool before serving with coconut cream.


*Yes, I need to go to the store!


Have you ever been to an afternoon tea?  What's your favorite treat?

Monday, August 20, 2012

Peach Vanilla Jam

Every time I think about peaches a certain song immediately pops into my head and usually stays for too long.  Who can complain when you're biting into a ripe, juicy peach though ;)

I'm going to can some peach jam this year, but this was actually made last year at the very end of peach season so you get this one first!  The skins were left on to add some fiber and texture, but feel free to peel your peaches (after a quick dip in boiling water) if you so desire.


Peach Vanilla Freezer Jam
adapted from Confessions of a Tart
yield:  3 jars

This jam is perfect on a biscuit, cheese platter, almond butter & jelly sandwich, stirred into yogurt...  you get the idea!

5 1/2c thinly sliced peaches  (peeled if you prefer)
1/2-3/4c packed brown sugara
juice of 1 lemon
1/2t vanilla extract
1/4t almond extract
seeds scraped from 3 vanilla beans

Add all ingredients to a medium bowl and stir until the sugar dissolves.  Refrigerate for 1-2 hours (or overnight).

Transfer fruit to a heavy-bottomed sauce pan and heat to medium high.  Bring to a boil, then reduce to low and gently simmer for 15-20min or more until jam has thickened.  Try the nudge test with a chilled plate to test if it's done.

If you want a chunky jam, you're done!  If you'd like a smoother jam, transfer (all or a portion) into a blender and process until it has reached your desired consistency.  Spoon into jar and freeze (for quite a few months) or refrigerate (for a few weeks).


Now, who's got a killer recipe for peach pie??

Thursday, March 8, 2012

Marmalade Jellies

First things first, the winner of the EB Mine Brunch giveaway.  Random.org says the winner is #9, Marcie!  Marcie, shoot me an email with your mailing address and we'll get those Eggland's Best goodies sent your way :)


After my first foray into jam-making this past summer, I was so excited to receive this cookbook for Christmas!  It's a great cookbook, full of information about the ingredients and process, in addition to some fantastic recipes, organized by season.


I wasn't quite sure if I was into marmalade, which is usually what happens to the citrus fruit that is plentiful now.  Given my love of meyer lemons I decided that I would try a Meyer Lemon Kumquat Marmalade first.

(Don't mind the tangerine in this picture...  I used all my kumquats!)

After acquiring enough lemons and kumquats for a half batch, I started the three day process of marmalade making.  Don't let that scare you--it's mostly hands-off!  Things were going well until it was time to test the jam.  I must've decided to test a little late, as my marmalade started to burn while my testing spoon was in the freezer.  Gone was my plan to can the marmalade.  I couldn't bring myself to toss it, so I lined a 9x13 pan with parchment paper and poured in the slightly over-cooked marmalade.  After a few hours in the fridge...  it worked!  I had marmalade candy! 


Like a little gummy candy, I scored small pieces using a pizza cutter and wrapped them in small pieces of parchment paper.  Friends and co-workers were none the wiser and enjoyed this sweet treat.  I'll call that a success :)

Have you had a recipe disaster you've been able to salvage into something tasty??

Thursday, December 22, 2011

Pumpkin Blondies

First things first, let me say thank you for entering my giveaway, you all make me smile every day.  Random.org chose the winner, Brandi!  Tomato jam and an appearance on the Dr. Oz show??  I don't know what more a girl could ask for ;)

I hope you haven't had too many cookies.  Because I've got two more for you, one a bit more decadent and another a healthy snack.  In the indulgent corner we've got a pumpkin blondie.  I did my best to retain a traditional blondie texture, but pumpkin is tough...  I did manage to retain the slightly crackly top!  The centers of the pan were a bit thinner (more gooey) than the outer edge (a bit cakier), but both parts were delicious in their own right ;)


Pumpkin Blondies

Pumpkin Blondies
adapted from Martha Stewart
Yield:  ~3 dozen

If you don't have an 11x15" pan, I'd suggest halving the recipe and baking it in a 9"square pan for the best results.

2c white whole wheat flour
1t baking soda
3/4t sea salt
1t cinnamon
1/8t freshly grated nutmeg
3/4t ground ginger
dash cloves
dash allspice
2 sticks butter, RT
1 1/4c dark brown sugar (not packed)
1 egg
1t vanilla extract
1c pumpkin butter (I used TJ's)
1c mini cinnamon chips
1/2c chopped toasted, skinned hazelnuts (pecans or walnuts would also be great)

Preheat oven to 350deg.  Spray an 11x15" pan with cooking spray.

In a medium bowl, add flour, baking soda, salt and spices (cinnamon thru allspice).  Stir to combine, then add cinnamon chips and chopped nuts and toss to coat.  Set aside.

Cream together butter and brown sugar in a mixer until light and fluffy.  Add the egg and vanilla, and beat until well combined.  Add pumpkin butter and mix well.  Fold in dry ingredients or mix on low speed.

Pour batter into pan, then spread evenly with a spatula.  Bake for 30-40min, until the center is no longer jiggly and a toothpick comes clean.  Cool completely on a rack before cutting into your desired size blondies!


pumpkin blondies (left), pumpkin oaties (right)


In the healthy corner, we have Pumpkin Oaties, which probably fall closer to snack than cookie due to the absence of added sugar.  Don't let this deter you, they're quite tasty and a nice guilt-free treat ;)


Pumpkin Oaties w/Rosemary Pecans & Cranberries
adapted from Enlightened Cooking
Yield ~2 dozen

I used a Trader Joe's mix of Rosemary Pecans and Cranberries in these cookies, but if you don't have access to a trader joe's, I'd use a mix of dried cranberries, salted pecans, and 1t fresh chopped rosemary.

1/2c mashed very ripe banana
1c pumpkin puree
1/3c mild-flavored oil (I used a mix of extra virgin olive oil and canola)
2t vanilla extract
1 1/4t cinnamon
1/4t fine sea salt (increase if using unsalted nuts)
1/2t baking soda
2c oats
1-2c Rosemary Pecans and Cranberries (see headnote)

Preheat oven to 350deg.

Mix banana, oil, vanilla, cinnamon, salt and baking soda in a medium bowl.  Let sit for 15min, then add remaining ingredients and mix well.

Scoop out ~1T cookie mix and place on a cookie sheet.  Flatten a bit with your fingers or a fork and repeat with remaining mixture.  You don't have to leave too much room in between cookies, they won't spread.

Bake for ~10-12min, then let cool on the sheet.  Store in an airtight container.


I'm submitting the Pumpkin Oaties to Ricki's Wellness Weekend!


Happy Hannukah, Merry Christmas, Happy Kwanzaa and all that jazz :)  Wishing you and yours a wonderful holiday season!!

Tuesday, November 29, 2011

Butternut Coconut Jam

With an abundance of butternut squash thanks to my CSA, I set out to try something different.  A quick perusal of my saved recipes and I found my inspiration.  Butternut coconut jam.  Oh yes.  Grated squash, cooked down to a jam-like consistency?  Awesome.


A unique addition to a cheese plate, this jam goes perfectly well with an assertive cheese.  I tried it with goat cheese, surprising no one :)

crostini w/goat cheese and butternut coconut jam

It also worked well in a pork tenderloin (1lb) that I stuffed with sage (1-2T), butternut coconut jam (1/2c) and gorgonzola (~1/3c).  I didn't write down an exact recipe, but it was similar to this technique.

stuffed pork tenderloin w/roasted brussels, sweet potatoes, onions and cranberries

Some other potential uses for the jam:
     as a cupcake filling
     inside a grilled cheese (w/sage or rosemary, nuts and/or apples)
     stirred into oatmeal
     on top of goat cheese ice cream
     in a fall s'more, between homemade graham crackers and marshmallows


Butternut Coconut Jam
adapted from The Kitch'n
Yield:

1 butternut squash (2-2.5lbs)
2c unsweetened almond milk
1 1/2c evaporated cane juice (or granulated sugar)
1/2c dark brown sugar (mine was unpacked)
1 cinnamon stick
8 whole cloves
2 vanilla beans
1c dried unsweetened coconut

Peel the butternut squash and cut into pieces.  Grate the squash (I used my food processor), or cut into small pieces.  Add squash, milk, sugars and spices into a large, heavy pot.  Split the vanilla beans and scrape out the seeds and add to the squash along with the scraped pods.  Cover and cook over medium heat until the squash is soft and tender (~15min or so).

Once the squash is tender, remove the cover and continue to cook on medium heat, stirring frequently until the mixture is reduced and thick like...  jam :)  Mine took ~1hr or so.  Remove from pan from the heat and stir in the coconut.  Once cool, fish out the cloves, cinnamon stick and vanilla bean pods.  I left the jam as-is as I wanted to retain some texture, but if you prefer a smooth jam mash or puree the mixture.  Store in the refrigerator.


How would you eat this butternut coconut jam?  Check back later this week for another use!

Thursday, June 3, 2010

Running Fuel

When this posts, I'll be on my way to Italy!   I am not traveling with a computer, so please excuse my absence for a bit.   I'll be sure to respond to any questions or comments when I return :)

I don't talk alot about nutrition here, in terms of fueling for exercise, because it is very individualized.  It took time to figure out what worked for me and what didn't.  In fact, I'm still experimenting and trying things out for optimal performance. 

When I first started running, my go-to was half a bagel with peanut butter.  And I wondered why I had to wait 2-3hrs before I could run without cramping!   It took way too long to put it together that pb takes awhile for me to digest.   Clif bars?  sit. like. a. rock.  even when you eat it 2 hours prior to your half marathon.   Oops.   However you might not have such issues :)  (Biking and swimming definitely pose less problems!)

After my peanut butter revelation, I switched to Luna bars when I needed fuel before a run.  These worked, and were portable when I was racing out of town, but I still needed some time to digest them.  At some point last winter ('08-'09) I discovered by sheer accident that I could run not long after eating a Pure bar!   I was a little skeptical at first, but realized that the dried fruit (dates and other fruit) are easy to digest and provide enough quick-burning fuel for me.    Elina tried my bar after completing her half marathon (congrats again!!) and asked me to share the recipe, so here's it is.  I reserve the right to keep tweaking it, too!


Running Fuel  (aka Fruit & Nut Bars)
Recipe by Shannon

I was trying to recreate the Pure bar, which uses agave and brown rice protein.  I don't have any protein powder right now, so I left it out, but like the idea of adding some to add some staying power.  The agave can help the bars together, but they also impart a softer texture.  In the summer heat, I've left it out, but it works both ways!

165g pitted Medjool dates
165g dried fruit  (cherries, blueberries, apples...  I had an antioxidant blend this time)
50-75g nuts  (almonds, cashews, walnuts...  I used a blend of all 3)
15-30g agave (optional)
5g brown rice protein (optional)

Roughly chop dates and dried fruit.  (I found I needed to do this for a more uniform mixture in my food processor)  Add dried fruit and nuts to the bowl of a food processor and blend until well combined.  Drizzle in agave if desired and run until the mixture comes together (it will start forming a ball).  Remove mixture and portion into whatever sizes you desire.  I made 10 bars from the amounts shown, each about 30g.  I wrap them up in a small piece of saran and store them on the fridge until I grab one and go!


What's your preferred pre-race nutrition?

Friday, February 26, 2010

Acai Berry Jam

I am a sucker for new/interesting products, and am trying to make a concerted effort to use more of the ingredients I have on hand, as there are quite a few! One of these ingredients (moved from Philly, unopened) was a jar of acai powder (fyi, it's cheaper on amazon) that I unearthed from the depths of my cupboard.

I happened to come across a recipe for Acai Berry Jam that I knew I'd have to try. Better yet, I had some some chia seeds purchased on sale, still waiting to be used. A fun way to use these ingredients, and a mild yet tasty jam that beats a lot of jarred ones :) I can't wait to add it to a slice of toast with almond butter!!

Acai Berry Jam

Have you tried acai powder? What's your favorite way to use it?

Friday, January 29, 2010

Black Bean Dip

It's been a long week, and work will continue to keep me busy well through next week, so please forgive my few words and lame post title :)


Tortilla Soup w/Guacamole & Flax Chips

Keeping in tune with using things up at home, I used a Tequila Lime Turkey Tenderloin and quite a few cans... that may or may not have made the move from Philly with me ;) (Hey, at least they were put to good use!) These goods went into Kelly's Tortilla Soup (very yummy!) and a random White Chili I probably wouldn't make again, so I didn't photograph it.

Carrot Cake Babies

As a carrot cake lover, I knew I had to try some of Katie's Carrot Cake Macaroons... however I don't have any coconut butter, so mine were made from a finely shredded carrot, unsweetened coconut, almond meal, dates and vanilla extract. I guess they ended up more like Diana's! Love these babies :) Although now I'm realizing I forgot cinnamon, walnuts, and other spices... next time!!


Gruyere Crackers

Hmm, I also made some Gruyere Crackers (made with cave-aged Gruyere instead of Parm, all white whole wheat flour, and Smart Balance sticks for butter) and Black Bean Dip to bring along with me tomorrow... it tastes better than it looks!

Black Bean Dip


Black Bean Dip


1 can black beans, drained (reserving 1T juice) and rinsed
1T reserved canning liquid
1-2T lemon/lime juice
1 clove garlic
1T chopped onion
1t chipotle/adobo sauce
pinch salt
~1/2t cumin
3-4T freshly chopped cilantro
1T olive oil

Combine all ingredients in food processor and blend until smooth! Serve with tortilla chips, veggies, or as a sandwich/wrap spread.

Thursday, September 3, 2009

A Versatile Dip

Thanks for all your comments on my race :) I may have dried out from last weekend's events, but my legs have been a bit slow to recover! That's ok, it'll give me time to bring up something I made... oh, I won't try to remember! I had roasted an eggplant and decided to make Hungry Girl's Creamy Eggplant Dip. My proportions were a little off as my eggplant wasn't as big as called for, but it was still yummy! I enjoyed it a few ways over the week:

Over heirloom tomatoes...


with homemade pita chips (seasoned w/salt, pepper, cumin, little cayenne)...


And maybe my favorite way...


This was a concoction almost entirely made in the microwave! Sometimes, you gotta do what you gotta do :) Brown and wild rice from a microwavable pouch, canned chickpeas (well-rinsed), broccoli and beans that I steamed... in the microwave with one of those steamer bags. Combined with the creamy dip, this made for an amazing lunch! Especially when the broccoli was from a family friend's garden and the beans from the farmers market were purple :)


Aren't they gorgeous? Even though they turned green after cooking, they still made me happy! I can't wait to get more eggplant... what's your favorite thing to do with it?

Wednesday, June 3, 2009

Mexican Slaw

Just like MizFit, I find it hard to actually use my jicama for anything other than a snack. When I had egg rolls in mind, I actually had to postpone making them as the first one I bought mysteriously disappeared before I had a chance to make it! I was very intrigued by the idea of using jicama as rice (thanks Gina!). But I had something else in mind given its crisp, juicy texture.

Perfect for a summer side dish, I decided to try out a Mexican Slaw, with the jicama taking the place of the traditional cabbage. What turned out was a simple side dish that was very refreshing-- an excellent addition to a picnic or bbq on a hot summer day!

Mexican Slaw

I forgot to actually write down a recipe when I made this, but here's what I did. Cut half of a medium-sized jicama into chunks and run through food processor. (I just put it in the bowl with the normal blade, but I bet you could grate it as well) Add desired amount of black beans, diced red and green peppers, corn (fresh or defrosted frozen). For a 'dressing' I kept it simple with freshly squeezed lime juice, Daregal Fresh Frozen cilantro, scant 1T canola oil, salt and pepper. Toss this all together, taste, and adjust it to your taste. I'm sure a squeeze of hot sauce would've worked well, but I didn't think of it at the time!

Tuesday, May 26, 2009

The root of my desire?

Katie's New Food Challenge strikes again! This time I picked up this funky looking root...


What is it? Yuca, or cassava. The cassava plant is a woody shrub with inedible leaves (they can make cyanide!) and a long thick root. Yuca does need to be cooked before consumption, so don't try it raw. It's a starch, similar to potato, that is a good source of calcium, phosphorus, and vitamin C. And here's a fun fact- tapioca is actually the starch extracted from yuca!

I picked a smaller piece, as I had NO idea how to get at the edible part and wasn't sure what I'd be able to do with it. Turns out you are supposed to peel the brown waxy rind... my peeler wasn't quite able to do that (too thick), so I just cut it away to reveal the white root underneath.


Ok, now what? After some contemplation and recipe searching, I decided to use my mandoline and thinly slice the yuca.


I then used this method to make yuca chips in the microwave! I could've done it in my oven, but it was already being used, and this was incredibly easy. I sprinkled them with a little bit of kosher salt, cumin, and cayenne pepper, tossed them around in a sprayed pie plate, and after 2-3 min, voila!


Along with a quick Mango-Avocado Salsa, my yuca chips made a great snack! If I had gotten a bigger root, they'd be perfect chip alternative at a bigger gathering :)

Mango Avocado Salsa
Recipe by Shannon

1/2c-3/4c diced mango
1/2 avocado, diced
1 small shallot, minced
1/2T-1T Daregal fresh frozen cilantro (or fresh cilantro, chopped)
juice of 1/2 lime

Combine all ingredients. Sit at room temp for a bit to let flavors come together before serving.

Tuesday, May 12, 2009

Berries 3 Ways

This post is dedicated to a friend of mine who, upon seeing me with a 2lb container of strawberries, asked what I was going to do with them. Hmm... "Eat them" just didn't quite seem like an adequate response! And while I did eat my fair share, I managed to try a few of your recipes-

Baked Oatmeal (minus the pepitas as I didn't have any)


I made a few slight changes to this recipe, cutting back on the honey in the ricotta mix, using agave nectar in the berries, and baking it in a small square pan instead of individual ramekins since I broke one of mine :(


While curd is usually made with citrus and egg yolks, pureed fresh strawberries took center stage in this Strawberry curd. The consistency was quite thick and made a nice spread on toast or into some greek yogurt! It was also fabulous on a rice cake with a layer of cheese (laughing cow, cream cheese, goat cheese...)--a great new spread!

So there you have it, just in time for summer- some ideas of what to do when you realize you just picked 10lbs of strawberries (not that I've done that...)!